This is Part 1 of Built to Last: A Reflection on Environmentally Conscientious Woodworking.
- Built to Last: A Reflection on Environmentally Conscientious Woodworking
- Part 1: I turned my woodshop into a personal solar farm.
- Part 2: Getting a handle on workworking chemicals, or sometimes we all need to vent.
- Part 3: Furniture as Revolution.
- Part 4: The best tool for the job is you
- A good joint is built to last: archaeologists uncover evidence for the earliest structural use of wood.
Note: there is an update to this project, here: Woodworking off the grid: upgrades to my DIY solar workshop.
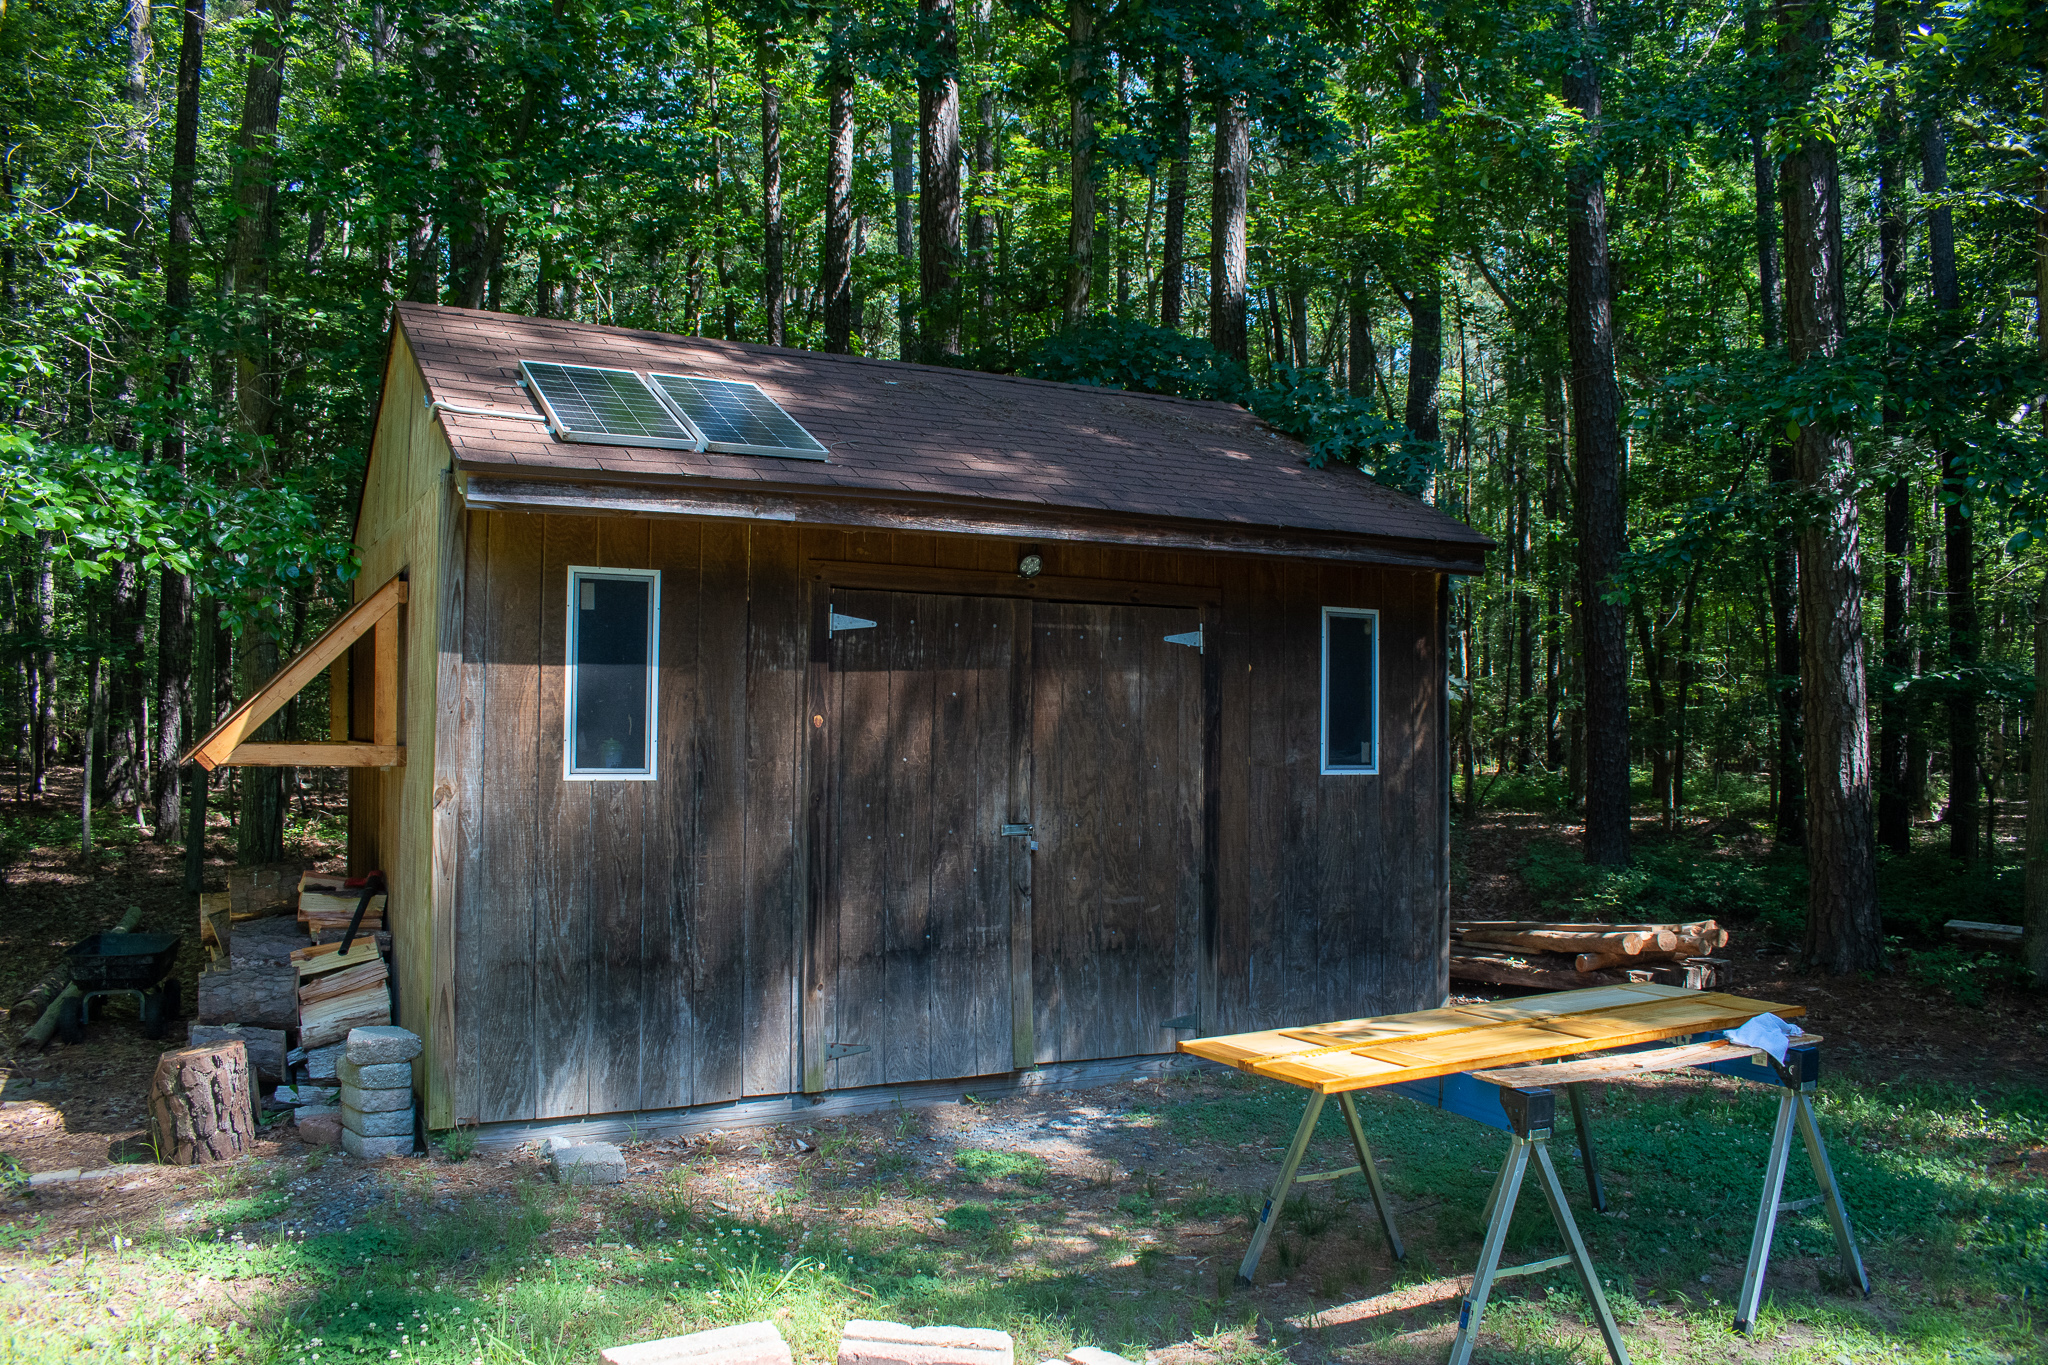
For almost a decade, I’ve dreamed of building an off-grid solar system to power my woodworking, provide reliable back-up power for my home, and reduce the number of 2-stroke engines in my life. This was finally the year where I had the time and resources to do it.
My workshop isn’t big. The 12-foot by 16-foot shed houses not just my tools and workbenches, but also all our yard and gardening supplies, storage for assorted seasonal gear and decorations, and a pile of robot parts. So I needed a compact system that still delivered the amps.
Building a small off-grid solar system is simpler than you might think. Building a small off-grid solar system that can run power tools is a bit more complicated.
While small off-grid solar systems have become dramatically cheaper and more accessible over the last decade, building one to power a workshop presents a particular challenge: the biggest tools in my workflow draw significantly more power than conventional appliances. My table saw pulls 15 amps with a peak start-up surge of nearly 3600 watts. My big router, that I use for flattening thick, live-edge slabs, isn’t much better.
There are a variety of other power tools in my shop, but the table saw, which calls for massive, temporary power surges when cutting through hardwood, and the router, which needs continuous, consistently high amperages when milling down a slab represent the most extreme needs of my workshop, and so I designed the system around those.
Counterintuitively, when designing a system around specific, heavy-power-draw tools, the actual wattage of the solar panels is less critical than getting the downstream components correctly sized. This is an off-grid system, it doesn’t draw power straight from the sun, it uses the sun to charge a battery bank, and the battery bank and inverter pairing has to work hard to run big shop tools. The solar part of this solar build is simpler and more streamlined than the power delivery component. The parts that require the most care and planning, and where you can get yourself into a lot of trouble, are not the panels, but the batteries and inverter.
Think of it as two complementary systems, a solar charging system for power generation, and an inverter for power distribution, united by a shared battery.
So before we even talk about the sun, I’m going to walk you through my inverter/power supply set-up.
Power Distribution
The most critical part of designing any electrical system is ensuring that every part of the system can handle the power demands without overheating, destroying components, or depleting your battery. Run your inverter continuously at maximum output and it’ll burn out in a few months. Drain your battery constantly because it is too small for your demands and it won’t last more than a handful of charge cycles. Use an inappropriate wire gauge and the system can go up in flames.
The key to all of this is to remember that Volts * Amps = Watts.
So I started with my needs, and worked backwards to create a system that meets those needs. My needs begin with a Dewalt 745 jobsite table saw and a Porter-Cable 690 LR fixed base router. The table saw is rated to 15 amps at 120 volts, so it pulls 1,800 watts. Practically speaking, you should generally assume that anything running an electric motor is going to pull twice its rated power draw on start-up, so the surge rating for this saw is 3,600 watts. I used a Kill-a-Watt watt meter to actually measure how much power the saw consumed and even running through hardwood with a dull blade, it never quite reached that peak.
The router is rated to 11 amps at 120 volts, giving it a much more modest 1320 watt draw, but still a 2640 watt surge. Like the table saw, I never actually saw those numbers in real-world testing, so designing to the max rating provides a reasonable safety buffer when selecting a system.
There’s one other issue that is critical to building the system right — the sine wave. Inverters take Direct Current (DC) and turn it into Alternating Current (AC). Alternating current, well, alternates. The charge on each lead switches back and forth between negative and positive. On the cheapest inverters, this happens as a modified sine wave – the leads cycle between positive and negative voltages in stepwise pattern. This is fine for simple electronics, but everything, even our drills, have tiny embedded computers, and modified sine waves can cause havoc in more delicate electronics. The more expensive pure sine wave inverters cycle AC in a smooth, continuous pattern.
Generally speaking, unless you have a very specific set-up, you should always opt for a pure sine inverter.
My saw and router will have no problem eating modified sine waves, but there’s one other critical function of the system, and that is to charge all my cordless tools. Modern cordless tool batteries, with embedded charge controllers and sophisticated lithium chemistries, are hungry for pure sine.
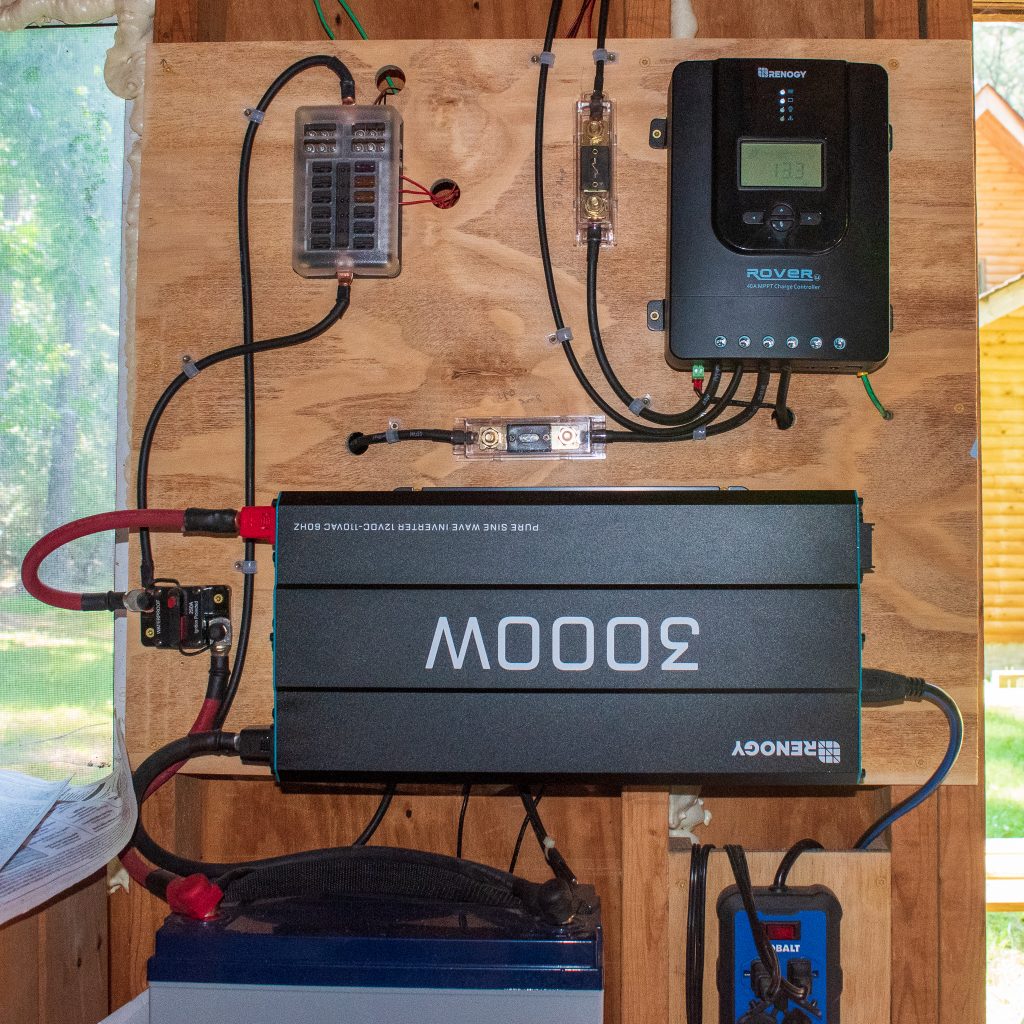
Now that I know my power needs, I can narrow down exactly what kind of inverter I need to power those tools. I went with a 3000/6000W inverter from Renogy that came with good reviews at a decent price (although, all told, the inverter was the most expensive single component of the build).
An inverter isn’t going to do you any good without a battery. Ultimately, I plan to have a bank of batteries that can keep the core appliances in my house running during a prolonged blackout, but for the initial set-up, I just want something that can run my tools for a reasonable amount of time and isn’t some weird configuration or exotic chemistry that will make it hard to match with other batteries when I eventually size up.
And it has to have the capacity to crank out amps. For big saws, I need a battery that can deliver a high peak discharge current. And that means more math.
The saw is drawing 3600 watts at the peak. At that theoretical peak, 30 amps are flowing between the tool and the inverter. But while the inverter is outputting AC, it’s pulling DC, at 12 volts, from the battery. That means that, at peak, the inverter could potentially pull 300 amps out of the battery. This rules out the more advanced lithium iron phosphate batteries, whose max continuous discharge is generally rated for 100 amps, compared to older battery chemistries, whose automotive legacy means they’ve been optimized to dump a ton of current quickly.
A battery also needs to last long enough to get the job done. Batteries come rated in amp hours: how many hours they can run pulling a single amp. Convert that to watt hours by multiplying by the battery voltage. So a 100-amp-hour battery at 12 volts gives you 1200 watt hours. It can consume 1 watt of power continuously for 1200 hours, or, alternatively, it can run an 1800-watt table saw for 40 minutes.
Except you don’t want to deplete your battery to zero. Generally speaking, you always want to keep it above 50% to maximize the life of the battery. So, realistically, it could run my table saw for 20 minutes.
That’s actually fine. I can’t remember ever needing to run a table saw for more than a few minutes during any of my projects.
The router, on the other hand, needs time. If it were actually pulling 11 amps, it would get a little over half an hour running at full capacity. But in all my tests, I never even got close to that. While slab flattening, power draw hovers around 400 watts. That would give me an hour and a half of slab-flattening time, running just on the battery.
I picked up a 100-amp-hour deep-cycle gel hybrid battery that’s rated to a maximum discharge of 1000 Amps, also from Renogy.
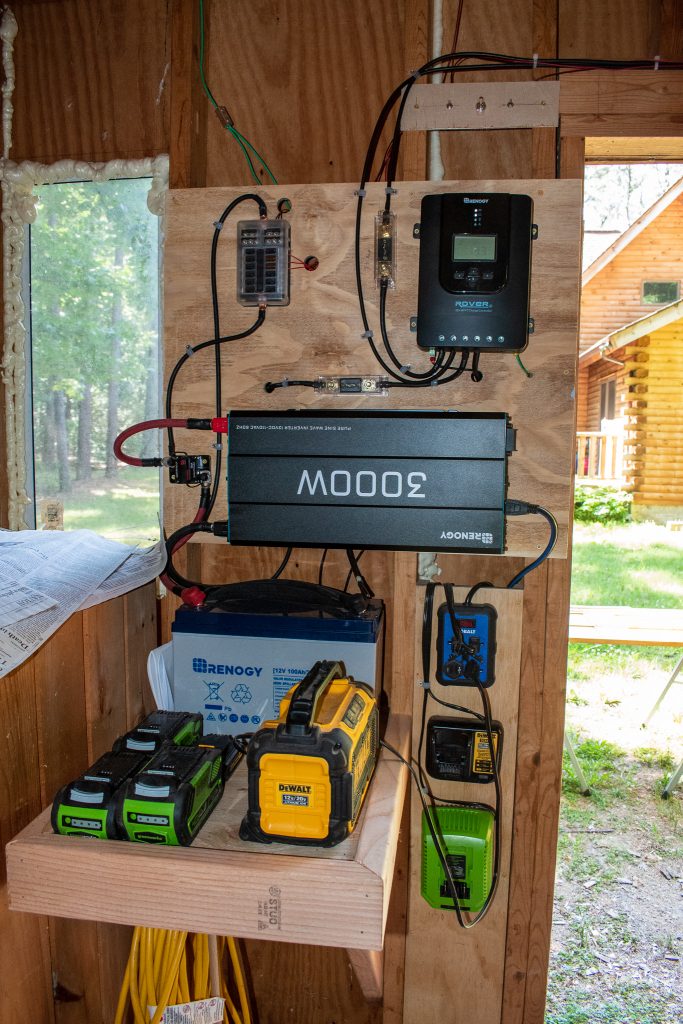
There’s one final component of the power distribution system. In addition to running corded tools and charging cordless tools, I also want some lights and other appliances in the shed. But if I run them through the inverter, then the inverter has to be on all the time, and it has a standby power draw of 2.5 amps – not a huge concern but it could drain the system over a dreary, cloudy week. A simpler solution is to go directly to the 12-volt battery and use automotive and RV lights. For that I used a small 12-volt fuse panel to connect up the lights.
The only thing left to do is make it safe. That requires a beefy circuit breaker and a grounding wire. I went with a 250-amp marine circuit breaker, wired between positive terminals of the battery and the inverter and 12-volt fuse block. 250 amps is rated a little lower than the maximum calculated load that the table saw could conceivably produce, but the reality is that we’re unlikely to see a load that high, and this way the breaker will trip well before I max out the system. I connected the battery to the inverter with short 1/0 welding wire, which is flexible enough to route through tight spaces, but thick enough to allow high current to pass without heating up and risking a fire. The 12-volt fuse block can be wired up with 4-gauge electrical wire.
And last, but far from the least important, I pounded an 8’ grounding rod into the ground and ran a solid core grounding wire to the grounding bolt on the back of the inverter. Neat.
And that’s the power distribution system. In this configuration it’ll last me a couple days of heavy use based on my woodworking workflow. But, of course, that’s not the goal. The goal is for it to work continuously. Discharging a battery is no fun if you can’t also charge it.
And so, at last, 1500 words into the section about building a DIY solar array, we’re finally going to talk about solar panels.
Power Generation
It seems a little weird to dive into a DIY solar system with everything but the actual solar array, but the reality is that with a set-up like this, and with the specific workflow of a weekend woodworker, the technical details of the solar part of my solar shed are largely trivial. Nailing down exactly how you’ll turn electricity stored in a 12-volt battery into something a woodshop can use is far more critical and far less forgiving than figuring out how to charge that battery.
Modern solar panels are good and cheap. Solar charge controllers are diverse, inexpensive, and reliable. Adding more capacity is fairly simple. The money and the danger all lie between the battery and the inverter.
I built this system with an eye towards upgrading, starting with a minimum viable system that I know I can add to. And that begins with a seemingly paltry, but absolutely adequate pair of 100-watt monocrystalline solar panels. That might not seem like much, but remember, unlike a grid-tied system, outside of a few hours a day, the panels aren’t directly powering your electronics, they’re charging your batteries.
The final essential component is the charge controller. This takes the electricity coming into the panels and regulates how it flows into the battery. There are two popular types of charge controllers: Pulse Width Modulation (PWM) and Maximum Power Point Tracking (MPPT).
PWM charge controllers work by slowly reducing the current flowing into the battery as it reaches capacity, and then providing a small trickle of charge to keep it topped up. They are cheaper, simpler, and fine for most small systems, but they are less versatile and the voltage of the batteries and the solar panels needs to match. They are also less efficient. MPPT controllers monitor the battery and panel state and adjust the current to maximize efficiency. They are more expensive but also more versatile and better able to maintain your batteries, but generally have a shorter lifespan.
At this point, I’ve already bought into the Renogy system, and their price to value ratio is pretty good, so I went with their 40-amp MPPT Rover charge controller.
An we’re still not ready to actually install those solar panels, because one important caveat is that you don’t connect the panels to the charge controller before the charge controller is connected to the battery, or you could ruin the unit. So actual solar power is the absolute last thing I installed in my solar powered woodshop.
The charge controller can output a peak of 40 amps to the battery, so I connected the two with a 40-amp fuse between them, then went through the set-up process to ensure that it was set to the correct voltage and battery chemistry. And finally, I connected the ground point to the ground line I installed for the inverter.
So we now have a 3000-watt inverter and a 12-volt fuse block connected to a 12-volt battery which is connected to a 40-amp MPPT charge controller. And at last, we are finally ready to install the solar panels.
I mounted the panels to the roof of my shed, facing south-ish. It’s not a perfect placement, but the shed doesn’t rotate and it’s good enough. The panels were wired in series, so that they output 24 volts at about 8 amps during their peak. This allows me to ultimately expand to 800 watts, with two parallel banks of 4 100-watt panels. You can already see from the numbers how much less current we’re dealing with on the power generation side compared to power distribution. Less current means smaller gauge wires, smaller fuses, and larger safety margins.
The final bit of safety is a 30-amp fuse between the solar panels and the charge controller. This protects the charge controller in the event of any large power surge.
All that’s left, now, is to wait for the sun.
I put some effort into making everything look neat and tidy, with a nice big rack for the battery, a panel to mount all my cordless tool chargers, and a bank of switches for the various lights I installed. And then I spent the next few months with chop saws, table saws, routers, circular saws, boomboxes, bench grinders, and a variety of portable tool batteries, charging and discharging and generally abusing the system to see how well it would perform.
Two big things I’ve noticed after months of use is that solar panels dramatically over-perform their specs and my tools dramatically under-perform. On a clear day when the sun is high in the sky, my 200-watt array could be outputting 40 volts at 10 amps for several hours, nearly twice their advertised capacity. Conversely, my tools never seem to get anywhere near their peak, even when working with big slabs of dense wood. This is good news. It means that with some very simple math, you can build an extremely safe and reliable solar system, without sweating the specs too much.
Is this a perfect system for everyone? No. I adhere to a spartan power mentality–the idea that if we’re going to build resilient, efficient electrical systems, we should start from the principle that electricity is a finite resource, and design for sparse access. I would love to build a 240VAC system that could power massive cabinet saws and oversized drum sanders, but I don’t need them, and keeping the system small and flexible also makes it adaptable. The day will come when I add a bench planer to my workflow, possibly a joiner and a lathe, maybe a drill press. There is plenty of room to upgrade, even without access to infinite amperes.
In conjunction with switching to electric lawncare, the Solar Woodshop also significantly reduces my emissions produced from homeownership. With the lawnmower, blower, and hedger now fully electric, the only 2-strokes left in my workflow are the chainsaw, for which electric options don’t quite meet the demands for tree felling and heavy chorin’, and the string trimmer, which only comes out for those tasks that the scythe can’t handle and will be replaced when it eventually wears out.
Overall, this entire system cost me a bit more than $1000. I suspect that it will never really pay for itself, especially after upgrading, but it makes my woodshop infinitely more usable, serves as a backup generator during power outages, and was a heck of a lot of fun to build.
For convenience, I’ve included a bill of materials for everything that went into this system, below. We do use Amazon Affiliate links, which provide me a small kickback if you buy something through them. That helps me keep the Southern Fried Science server running and funds other fun, weird projects, but I’d much rather you buy directly from the manufacturer when possible. If you got some value out of this and want to support more weird projects, you can always kick a buck or two into my Patreon campaign: Andrew Thaler is creating tools for ocean science, education, and conservation.
Bill of Materials (Note, I also used a general assortment of basic electrical tools like cutters, crimpers, and heat shrink, not listed here).
- Renogy 3000W 12V Pure Sine Wave Inverter
- Renogy Deep Cycle Hybrid Gel 12 Volt 100Ah Battery
- Renogy Rover 40 Amp 12V/24V DC Input MPPT Solar Charge Controller
- Renogy 100 Watt 12 Volt Monocrystalline Solar Panel
- Renogy Solar Panel Mounting Z Bracket
- Renogy 30A Set w Holder ANL Fuse
- Renogy 40A Set w Holder ANL Fuse
- Renogy 8ft. 10 AWG Wire Copper Tray Cable
- Erayco 250 Amp Circuit Breaker with Manual Reset
- WUPP Boat Fuse Block
- 1/0 AWG Gauge Red + Black Pure Copper Battery Inverter Cables
- 10 pcs WNI UL 1/0 Gauge x 5/16 Pure Copper Battery Welding Cable Lug Connector
- Rustark 15 pcs 6 AWG-5/16″ Copper Battery Ring Terminal Connectors
- ProTool Heavy-Duty Battery Cable Terminal Crimping Tool
- 22AWG 20M/65.6ft Extension Cable Wire Cord
- 12V Interior LED Light Bar
- P3 P4400 Kill A Watt Electricity Usage Monitor
- Copper Ground Rod (I don’t have a SKU for the one I used, but this is similar)
- Pure Solid Bare Copper Grounding Wire
- uxcell 5 Positions Electric Wire Screw Terminal Ground Copper Neutral Bar


